
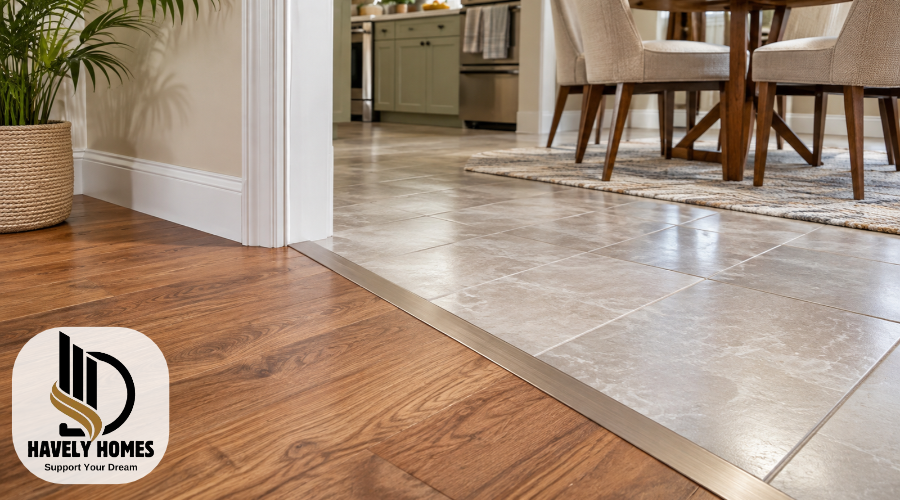
Combining wood and tile flooring is a practical way to create a beautiful and comfortable home. Wood brings natural warmth and character, while tile offers a durable surface that works well in busy areas. When used together, these materials can make different rooms feel connected without losing their individual style.
However, moving from a wood floor to tile requires more than choosing attractive materials. The point where both floors meet needs careful planning to avoid uneven edges, unwanted gaps, and potential tripping hazards.
Whether you are renovating your kitchen, updating a hallway, or connecting two rooms, the right flooring transition can make a noticeable difference. Understanding floor heights, transition strips, installation requirements, and costs will help you choose a solution that looks good and performs well over time.
Quick Answer:
A wood floor to tile transition connects two different flooring surfaces. First, check their heights, edge condition, and expansion requirements. Choose a suitable transition strip or flexible joint for a smooth, safe finish.
Quick-Guide Table
| Possible problem | What to check | Recommended action |
| Uneven floor heights | Difference between finished wood and tile levels | Choose a suitable reducer or sloped transition profile. |
| Loose transition strip | Movement, damaged fixings, or poor support | Have the fixing method checked and repair or replace the strip. |
| Cracked tile edges | Missing edge protection or unsupported tile | Repair damaged tiles and use a suitable protective profile. |
| Wood swelling near tile | Moisture exposure and restricted movement | Address the moisture source and consult a flooring professional. |
| Gaps between floors | Wood movement and joint condition | Check manufacturer requirements before choosing a suitable joint treatment. |
| Movement beneath flooring | Loose boards, bouncing, or damaged subfloor | Arrange professional assessment before installing new tile. |
Helpful Steps: What to Check Before Choosing a Transition
- Check floor heights: Compare the finished wood and tile surfaces to identify any noticeable difference.
- Inspect the edges: Look for loose boards, chipped tiles, moisture damage, or uneven gaps.
- Identify the wood flooring: Determine whether it is solid hardwood, engineered wood, or floating flooring.
- Review installation requirements: Check the flooring manufacturer’s instructions for movement gaps and compatible transition profiles.
- Consider everyday use: Choose a transition shape that is comfortable to walk across and suitable for the room.
- Seek professional help when necessary: Avoid DIY cutting or repairs involving damaged subfloors, significant height differences, or structural movement.
Understanding Wood Floor to Tile Transitions
A wood-to-tile transition is the area where wooden flooring meets ceramic, porcelain, or natural stone tile. This connection commonly appears in doorways, open-plan rooms, kitchens, and hallways.
There are two different projects homeowners may be considering. The first involves joining an existing wooden floor to an adjacent tiled surface. The second involves removing wooden flooring and preparing the underlying structure for new tile installation.
These projects require different methods because wood and tile behave differently.
Wood flooring naturally expands and contracts as moisture conditions change. Tile is comparatively dimensionally stable, although the tile installation also needs appropriate movement joints to accommodate changes and building movement.
If these differences are ignored, flooring problems can develop. Wood may become restricted, while tile edges or grout can experience unwanted stress.
The finished height of each surface is equally important. When both floors are level, a discreet transition may be possible. When one floor is higher, a suitable transition profile can help create a safer connection.
A successful transition must accommodate movement, protect exposed edges, and remain comfortable to walk across.
Where Wood and Tile Flooring Work Best Together
Wood and tile combinations are useful in homes where different rooms have different flooring requirements.
The kitchen and living room are a popular example. Tile can provide a practical cooking-area surface, while wood creates a warmer appearance in the adjoining living space.
Hallways and entrances can also benefit from this combination. Tile near an exterior door is often easier to clean after muddy shoes or wet weather. Wooden flooring can continue into nearby rooms for a more welcoming appearance.
In bathrooms, tile is generally better suited to areas exposed to frequent water. A carefully planned doorway transition can connect the bathroom floor with wood flooring in the hallway or bedroom.
Open-plan homes offer additional possibilities. Instead of installing walls or partitions, homeowners can use different flooring materials to visually separate cooking, dining, and relaxing areas.
Before choosing a combination, consider everyday foot traffic, cleaning requirements, moisture exposure, and how the flooring will look from one room to another.
The most suitable layout balances attractive design with the practical needs of each space.
Wood Floor to Tile Ideas for a Stylish Home
There are several creative wood floor to tile ideas that can complement different interior styles.
A straight transition is one of the simplest choices. It creates a clean boundary between materials and works particularly well in doorways and modern interiors.
Diagonal transitions introduce visual interest, especially in larger rooms. However, they often require more careful measuring and cutting.
Curved transitions can create a softer appearance, although their installation is more complicated. The selected flooring and transition materials must be suitable for the intended shape.
Geometric designs are another option. Hexagonal tiles, for example, can form an interesting boundary beside wooden planks. These arrangements require accurate cutting and proper support at the edges.
Colour selection is also important. Light oak flooring often looks attractive beside cream, beige, or pale grey tiles. Darker wood can create contrast with lighter stone-look finishes.
Consider the direction of the wooden planks and the size of the tiles. Long planks can make a space appear more continuous, while larger tiles may create a less visually busy surface.
For inspiration, look at tile and wood floor combination pictures that show completed installations, including close-up views of the actual transition.
Kitchen Tile and Wood Floor Combination Design Ideas
Kitchens are among the most useful places to combine wood and tile because they often connect directly to dining or living areas.
One practical arrangement is to install tile throughout the kitchen and continue wooden flooring into the adjoining dining space. The change in material creates a natural division without requiring a wall.
Another design uses tile around the main kitchen working area, with wood across the surrounding room. This can look attractive in an open-plan layout, but the shape of the tiled section should be planned carefully.
For a balanced appearance, coordinate the flooring with existing cabinets, countertops, and wall colours.
Warm wooden floors can complement cream tiles and natural wood cabinets. Grey stone-look tiles may work well with medium-toned oak and simple white cabinetry.
Patterned tiles can introduce character, but using too many competing patterns may make the kitchen feel visually crowded.
When browsing kitchen tile and wood floor combination pictures, pay attention to three useful details: the colour relationship, the location of the flooring boundary, and the finishing method.
Remember that wooden flooring near sinks and dishwashers still needs protection from spills and ongoing moisture exposure.
A good kitchen flooring design should be attractive, comfortable, and practical for everyday cleaning.
Choosing a Smooth Transition Between Floors of Equal Height
When wood and tile finish at approximately the same height, creating a smooth transition is usually easier.
A nearly flush connection can make the flooring look continuous while reducing noticeable changes underfoot. However, the surfaces must be correctly aligned, and the connection still needs to accommodate movement.
One option is a low-profile transition strip designed for adjoining hard floors. These profiles can cover the boundary and help protect exposed flooring edges.
In certain installations, a compatible flexible movement-joint treatment may provide a more discreet appearance. Suitable sealants or other joint materials must be selected according to the flooring system and joint requirements.
A decorative filler should not automatically be treated as a replacement for an approved movement joint. Ordinary rigid grout, for example, is generally unsuitable where differential movement needs to be accommodated.
The installation method of the wood also matters. Floating wooden floors need freedom to move and must not be trapped by a fixed transition.
For the best result, check the flooring manufacturer’s requirements before selecting a flush joint or profile.
Wood to Tile Transition Ideas for Different Heights
A wood to tile transition different heights situation occurs when one finished flooring surface sits above the other.
This can happen because of differences in material thickness, adhesive layers, underlayment, or existing subfloor construction.
A reducer strip is a common solution for a manageable height difference. It provides a sloping connection between the higher and lower surfaces.
Some flooring profiles include adjustable sections that accommodate particular height variations. These can be useful when a conventional transition strip does not fit the finished floors correctly.
The direction of the height change is important. A profile designed for tile meeting a lower surface may not work correctly when the wooden flooring is higher.
Avoid leaving an abrupt raised edge where people regularly walk. This can create a tripping hazard, especially for children, older adults, or people with limited mobility.
For larger differences, changing the underlying floor build-up may be more appropriate than installing a steep transition strip.
A flooring professional can assess the height difference and recommend a suitable approach that protects both materials.
Wood Floor to Tile Transition Strip Types and Materials
Choosing the right wood floor to tile transition strip helps improve the appearance and durability of the flooring connection.
Different profiles serve different purposes, so the selection should depend on floor height, flooring construction, and expected movement.
T-Moulding
T-moulding has a raised top that overlaps the edges of adjoining flooring materials. Many designs are intended for surfaces at similar heights.
The profile needs the correct supporting gap and must be installed without restricting a floating floor’s required movement.
Reducer Strips
Reducers are designed to connect surfaces at different heights. Their sloping shape provides a more gradual change between flooring materials.
They are commonly used where the height difference is suitable for the selected profile.
Threshold Profiles
Thresholds are often installed across doorways. They can create a defined boundary and provide a finished appearance between adjoining rooms.
Some designs are raised, so selecting the correct height and shape is important.
Tile Edge Profiles
Specialised metal profiles can protect exposed tile edges while creating a neat boundary beside another floor covering.
These may be installed during tile laying, although certain products are suitable for existing floors.
Transition strips are available in several materials, including wood, aluminium, brass, and stainless steel.
Wooden strips can blend naturally with timber flooring, while metal finishes offer a more defined decorative edge.
Choose a material that suits the room’s appearance, cleaning needs, expected wear, and manufacturer-approved installation method.
Important Checks Before Starting a Flooring Transition
Careful preparation can prevent several common flooring problems.
Begin by examining both surfaces and measuring their finished heights. Include the relevant flooring layers rather than comparing only the thickness of the visible wood and tile.
Check the existing edges for loose materials, cracks, moisture damage, or uneven sections.
It is also important to identify the wooden flooring system. Solid hardwood, engineered wood, glued flooring, and floating flooring may have different installation requirements.
Before purchasing materials, complete these basic checks:
- Measure the length and width of the transition area.
- Compare the finished heights of both flooring surfaces.
- Check the edges for damage or movement.
- Identify the existing flooring and installation method.
- Review the manufacturer’s expansion-gap instructions.
- Check whether nearby doors will clear the finished profile.
Look for signs of water damage before covering any existing gap. A transition strip should not hide an unresolved moisture problem.
If cutting is required, use appropriate protective equipment and follow the tool manufacturer’s instructions. Cutting tile or cement-based materials can produce harmful silica dust, requiring suitable dust-control methods.
Homeowners unfamiliar with power tools should consider professional installation rather than attempting complicated cuts.
How to Plan and Create a Neat Wood-to-Tile Transition
A neat flooring transition begins with a clear installation plan.
First, determine where the two materials will meet. Doorways usually provide a natural location, while open-plan spaces may require more careful consideration of furniture placement and walking routes.
Next, measure the transition and choose an appropriate finishing method.
A practical planning sequence includes:
- Inspect the flooring: Confirm that both surfaces and their supporting layers are suitable for the proposed transition.
- Measure the height difference: Identify whether a same-height profile, reducer, or another approved solution is required.
- Choose the finish: Select a strip or joint system compatible with the flooring materials.
- Plan the movement allowance: Follow the relevant instructions for expansion gaps and movement joints.
- Prepare the boundary: Ensure edges are properly supported, clean, and suitable for the selected installation method.
- Install and inspect: Follow the profile manufacturer’s fixing instructions and check the finished connection for stability and walking comfort.
Never assume that construction adhesive or screws can be used with every transition strip. Some profiles use tracks, while others are secured as part of the tile installation.
Avoid fastening through a floating wooden floor in a way that prevents its natural movement.
Where sealants, adhesives, or mortar are required, follow their stated curing times before allowing normal use.
After installation, clean the transition using products suitable for its finish. Periodically inspect it for movement, loose edges, or damage.
Complicated layouts, extensive cutting, and significant floor-height corrections are better handled by an experienced flooring installer.
Can You Install Tile Over an Existing Wood Floor?
Installing tile over a wooden floor requires careful consideration because not every wooden surface provides a suitable base.
Finished hardwood flooring is generally not recommended as a direct substrate for tile. Individual boards can expand, contract, or move, making them difficult to bond to reliably.
A structural plywood or oriented strand board (OSB) subfloor is different from finished hardwood. Certain tile installation systems are specifically designed for suitable wood-based subfloors.
However, the floor structure must meet the requirements of the chosen system.
A floor that bends excessively can cause cracked tiles, damaged grout, or installation failure. Adding cement backer board does not correct inadequate structural strength.
Cement backer boards are commonly used as tile underlayment over approved wood subfloors. They must be installed with the specified supporting mortar, fasteners, joint treatment, and other required details.
Uncoupling membranes are another option in compatible installations. These are designed to help manage movement between the supporting floor and the tile covering.
Neither product removes the need for a structurally suitable base.
Before installing tile, the subfloor should be assessed for stability, flatness, moisture problems, and compliance with the selected system.
In wet areas, appropriate waterproofing may also be necessary.
If the existing floor is damaged, noticeably flexible, or unsuitable for tile, removal and further preparation may be required. Significant structural concerns should be assessed by a qualified professional.
Wood Floor to Tile Cost: What Affects the Price?
The overall wood floor to tile cost depends on whether you are creating a small transition or completing a larger flooring renovation.
A simple doorway connection will generally involve less work than replacing flooring across an entire kitchen.
Transition strip material influences the budget. Basic profiles may cost less than specialised metal finishes or custom-made wooden pieces.
Installation complexity also matters. A straight boundary is usually easier to prepare than a curved or geometric design requiring numerous detailed cuts.
Other expenses may include floor levelling, damaged material replacement, underlayment, adhesives, and labour.
For DIY projects, remember to include suitable tools and protective equipment rather than calculating material costs alone.
Professional quotations may cover measuring, preparation, installation, and finishing, but the included services vary.
Before accepting a quotation, ask what work is included and whether subfloor repairs or material removal will cost extra.
Comparing itemised quotations helps homeowners understand the total cost without relying on a single general price estimate.
Common Wood-to-Tile Transition Problems and Mistakes to Avoid
Even an attractive flooring combination can develop problems when installation details are overlooked.
One common issue is an uneven transition. A raised strip or poorly aligned tile edge may feel uncomfortable and create a tripping hazard.
Loose transition profiles are another problem. They may indicate unsuitable fastening, damaged supporting material, or movement that the installation has not accommodated.
Chipped tile edges can develop when the boundary lacks suitable protection or support.
Visible gaps are not always defects because wood flooring needs movement space. However, gaps that are unusually large, changing, or exposing damaged material deserve investigation.
Moisture can also affect the finished connection. Water entering an unsuitable joint may damage wooden flooring or underlying materials.
Other mistakes include using rigid grout where a movement joint is required, choosing an incompatible profile, or installing tile over an unstable wooden base.
Rushing the work can create difficulties too. Adhesives and mortar need appropriate curing conditions, and flooring materials must be installed according to their instructions.
If a transition repeatedly becomes loose, wood boards begin lifting, or tile grout continues cracking, the underlying problem should be identified rather than simply covered.
Professional help is particularly important when there is persistent movement, suspected structural damage, extensive moisture exposure, or a substantial height difference.
Conclusion
A well-planned wood floor to tile transition can make your home look more attractive while improving everyday comfort and practicality.
Whether you prefer a simple straight boundary, a decorative geometric design, or a discreet transition strip, the best solution depends on your flooring materials, finished heights, and room conditions.
Proper preparation is just as important as appearance. Allowing suitable movement, protecting exposed edges, and checking the supporting floor can help prevent avoidable problems.
Take time to compare designs, inspect your existing flooring, and choose materials that suit your space. For complicated installations or structural concerns, professional guidance can help you achieve a safer and more durable result.
Frequently Asked Questions
Can Wood And Tile Meet Without A Transition Strip?
Yes, some installations can use a suitable flexible joint instead of a visible strip. Both surfaces need proper support, compatible movement allowances, and a joint treatment approved for the flooring system.
What Tile Colours Look Best With Wooden Floors?
Beige, cream, grey, and natural stone-look tiles often complement wooden flooring. Lighter tiles create contrast with dark wood, while warm neutral shades can blend beautifully with oak and other natural finishes.
Are Hexagon Tile And Wood Floor Combinations Difficult To Install?
Hexagon transitions can be more complicated than straight boundaries because they require accurate cutting and careful edge finishing. Professional installation is often preferable, especially when the design includes irregular wooden plank cuts.
Should A Transition Strip Match The Colour Of The Wooden Floor?
Not necessarily. Matching wood finishes create a subtle appearance, while brass, aluminium, or contrasting profiles can add definition. Choose a finish that complements both floors and suits the room’s overall design.
Can You Install A Transition Strip After Both Floors Are Finished?
Yes, certain transition profiles are designed for existing floors. However, installation depends on the available gap, flooring height, edge condition, and fixing requirements. Always check the selected product’s instructions.
Disclaimer: This article is provided by Havely Homes (havelyhomes.com) for general informational purposes only. Flooring materials, installation methods, and manufacturer requirements may differ. Always check official product instructions before attempting repairs or installation. For structural problems, major floor levelling, or complicated transitions, consult a qualified flooring professional.
