
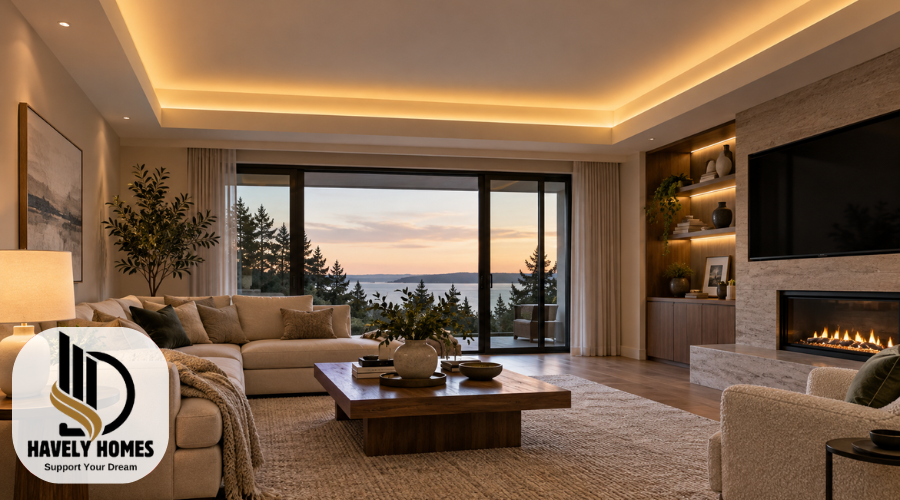
Good lighting can make a room feel more comfortable, welcoming, and attractive. While traditional ceiling lights illuminate a space directly, cove lighting creates a softer effect by hiding the light source and allowing its glow to spread across the ceiling or walls.
This lighting style works well in modern homes, but it can also complement traditional interiors. Whether you want a relaxing bedroom, a stylish living room, or an attractive ceiling design, concealed lighting offers several possibilities.
However, achieving the right result requires more than installing LED strips. The ceiling design, light placement, brightness, color temperature, and electrical components all influence the finished appearance.
Understanding the available designs, installation requirements, and costs can help you choose lighting that improves your home without creating unnecessary complications.
Quick Answer:
Cove lighting uses hidden fixtures, usually LED strips, to reflect soft light across ceilings or walls. Before installing it, check your ceiling design, available space, lighting requirements, and electrical safety considerations.
Quick-Guide Troubleshooting Table
| Possible Problem | What to Check | Recommended Action |
| LED lights flicker | Dimmer settings and product compatibility | Check manufacturer guidance. Contact an electrician if flickering continues. |
| Visible LED dots | Strip placement and diffuser design | Consider a suitable diffuser or adjusted positioning during installation. |
| Uneven ceiling lighting | Strip position and ceiling reflections | Review the lighting layout and ask an installer about adjustments. |
| Lights appear too bright | Brightness settings and light color | Reduce brightness using compatible dimming controls. |
| Lighting does not turn on | Wall switch, accessible plug, or smart controls | Check normal controls without opening electrical components. |
| Burning smell or unusual heat | Signs of overheating or electrical failure | Stop using the system and contact a qualified electrician. |
Helpful Steps for Planning Cove Lighting
- Choose the lighting purpose: Decide whether you want decorative lighting, general background illumination, or both.
- Measure your space: Record the room dimensions and intended lighting areas.
- Select a suitable design: Consider tray ceilings, recessed coves, floating ceilings, or specialized crown molding.
- Choose comfortable lighting: Compare LED brightness, color temperature, and available dimming options.
- Check product instructions: Confirm suitable mounting requirements, electrical compatibility, and maintenance access.
- Get professional assistance: Use a qualified electrician for fixed wiring and electrical installation work.
What Is Cove Lighting and How Does It Work?
Cove lighting is a form of indirect lighting in which light fixtures are concealed behind ceiling edges, recessed sections, ledges, or decorative molding.
Instead of shining directly into the room, the light usually travels upward or toward a nearby surface. It reflects from the ceiling or upper walls, creating a gentle, diffused glow.
The main difference between direct and indirect lighting is how illumination reaches the room. Direct lights shine toward specific areas, while indirect lighting relies on reflected light to create a softer effect.
For example, recessed spotlights can provide focused illumination over furniture, while concealed LED strips add background brightness around the ceiling.
Cove lighting works best as part of a layered lighting design. Combining it with ceiling fixtures, wall lights, or table lamps allows homeowners to adjust the room’s atmosphere without sacrificing practical visibility.
The final effect depends on the surrounding surfaces, fixture placement, and amount of light produced.
Different Types of Cove Lighting for Home Ceilings
Different ceiling designs create different lighting effects. Choosing the right style depends on your room’s height, existing structure, and interior design.
Tray ceiling cove lighting uses the raised central section of a tray ceiling. LED strips can be concealed along the surrounding ledge, illuminating the upper ceiling and emphasizing its shape. This design works particularly well in bedrooms and living rooms.
Recessed cove lighting places lighting inside a specially constructed ceiling recess. The hidden light source creates a clean appearance without exposed fixtures. It is suitable for contemporary interiors where simple ceiling details are preferred.
Floating ceiling lighting uses a suspended ceiling feature with concealed lighting around its edges. The reflected glow can make the central panel appear visually separated from the surrounding ceiling.
Dropped ceiling cove lighting incorporates lighting into a lowered ceiling section or soffit. It can help define dining spaces, living areas, or other zones within larger rooms.
Rooms with limited ceiling height may benefit from shallow cove details or molding-based solutions rather than extensive suspended structures.
Before selecting a design, consider how much ceiling space the construction requires and whether existing electrical services can accommodate the installation.
Crown Molding Cove Lighting for Existing Rooms
Crown molding offers another way to introduce indirect lighting without completely rebuilding an existing ceiling.
Specially designed cove lighting molding contains a concealed space for an LED strip or compatible lighting channel. When installed near the ceiling, the molding hides the light source while allowing illumination to spread upward.
Available molding materials include polyurethane, polystyrene, wood, and other decorative products. Their suitability depends on the installation method, structural support, and lighting manufacturer’s requirements.
Some moldings have dedicated mounting surfaces and channels that help position the lighting correctly.
This approach can work especially well in traditional living rooms, bedrooms, and renovated spaces where major ceiling alterations are undesirable.
However, ordinary decorative molding is not automatically suitable for electrical lighting installations. Choose a product intended for the purpose, and confirm that it provides adequate support, heat management, and maintenance access.
A properly selected molding profile can improve the room’s appearance while keeping the lighting discreet.
Beautiful Cove Lighting Ideas for Different Rooms
Cove lighting can improve different areas of a home, but each room benefits from a slightly different approach.
Living rooms
A concealed lighting strip around the ceiling perimeter can create a welcoming atmosphere for relaxing or entertaining guests.
Warm white lighting works well with neutral walls, wooden furniture, and comfortable seating arrangements. Dimmable controls allow the brightness to change according to the occasion.
Bedrooms
Soft lighting along a tray ceiling or behind decorative molding can create a peaceful environment.
Choose adjustable brightness so the room can feel comfortable in the evening. Bedside lamps should still provide suitable illumination for reading.
Kitchens and dining rooms
Indirect ceiling lighting can highlight architectural details and make dining areas more inviting.
In kitchens, combine it with dedicated task lighting over countertops, sinks, and food preparation areas. Reflected ceiling light alone may not provide enough visibility for these activities.
Hallways
A continuous strip along a ceiling recess can make a narrow hallway feel more welcoming. However, stairs and circulation areas still need sufficient direct or general lighting for safe movement.
Bathrooms
Concealed lighting can create a calm atmosphere, especially around suitable ceiling features.
Bathroom installations require particular attention to moisture exposure, approved fixture ratings, electrical protection, and local installation rules. A qualified electrician should determine the appropriate equipment and placement.
Choosing the Right LED Strips for Cove Lighting
LED strips are commonly used for concealed lighting because their slim, flexible design allows them to fit into suitable ceiling details.
However, different LED strips offer different levels of brightness, color quality, flexibility, and lighting consistency.
Conventional LED strips contain separate light-emitting components arranged along a flexible circuit. Depending on their spacing and installation, individual points of light may become noticeable.
COB LED strips use closely grouped light-emitting chips beneath a continuous coating, often producing a more uniform-looking light line. However, the final appearance still depends on the cove design and surrounding surfaces.
Several components influence LED strip performance:
- Aluminum channels: Provide mounting support and can help transfer heat away from compatible LED strips.
- Diffusers: Help soften visible points of light and improve the appearance of the illuminated strip.
- LED drivers: Supply the electrical output required by the lighting system.
- Controllers: Enable compatible dimming, color adjustment, or smart lighting functions.
Check the strip’s voltage, power requirements, maximum supported run length, and approved mounting method before installation.
Some LED strips can be shortened at marked cutting points, while others have specific restrictions. Always follow the instructions for the exact product.
Choose lighting components with appropriate safety certification for your location, and avoid mixing equipment that has not been confirmed as compatible.
Best Cove Lighting Colors, Brightness, and Controls
Choosing the right light color is important because it influences how the room looks and feels.
Color temperature is measured in Kelvin (K), and different values produce different shades of white light.
Warm white lighting, commonly around 2700K to 3000K, creates a softer appearance that often suits bedrooms, living rooms, and dining spaces.
Neutral white lighting, around 3500K to 4000K, provides a more balanced appearance and may work well in kitchens or multipurpose rooms.
Cooler white lighting can create a brighter-looking visual effect, although it may feel less relaxing in some residential settings.
Brightness is measured in lumens. The amount required depends on the room’s size, ceiling finish, other lighting fixtures, and intended use.
Another useful specification is the Color Rendering Index (CRI), which describes how accurately a light source renders colors compared with a reference source. Products with a CRI of 80 or higher are commonly suitable for general residential lighting, while higher color fidelity may be desirable in certain spaces.
Dimmable LED strips provide greater flexibility. Compatible smart controls can also support adjustable white tones, scheduled lighting, and personalized settings.
Important Cove Lighting Details for a Smooth Finish
A well-designed cove should produce balanced illumination without exposing the light source or creating distracting bright spots.
The depth of the recess, width of the opening, and position of the LED strip influence how light spreads across the ceiling.
Placing a strip too close to a surface can produce concentrated bright areas. Poor positioning may also leave visible shadows or uneven lighting.
The ceiling finish is equally important.
Light-colored ceilings generally reflect more illumination than darker surfaces. Matte finishes can help create a softer appearance, while glossy finishes may produce noticeable reflections.
A continuous lighting effect also depends on suitable strip placement, consistent light output, and carefully planned corners.
LED channels and diffusers can improve uniformity, but they cannot correct every problem caused by poor positioning.
There is no single installation clearance that works for every ceiling design. The correct dimensions depend on the lighting product, available space, surface geometry, and desired effect.
Testing the planned lighting arrangement before completing the ceiling finish helps identify problems while adjustments are still possible.
How to Plan and Install Cove Lighting Safely
Planning is essential for achieving an attractive and reliable lighting installation.
Start by examining the room’s dimensions, ceiling construction, and available mounting areas. Decide whether the lighting will follow the entire ceiling perimeter or highlight selected sections.
Next, consider how the lighting will receive power and where its controls and driver will be located.
A practical planning process includes:
- Measure the intended lighting area and record the required strip lengths.
- Choose a ceiling or molding design that provides adequate space for the lighting components.
- Check the manufacturer’s mounting, electrical, temperature, and ventilation requirements.
- Select compatible LED strips, drivers, channels, and controllers.
- Arrange a safe, accessible location for components that may require inspection or replacement.
- Test the lighting arrangement before permanently closing the ceiling or molding.
Homeowners may be able to handle basic measurements, design planning, and approved plug-in lighting kits according to their instructions.
However, installing new electrical circuits, modifying fixed wiring, or connecting hardwired lighting components should be handled by a qualified electrician.
Never conceal an unsuitable power adapter inside an inaccessible ceiling cavity or cover ventilation openings.
Electrical installations must follow applicable local requirements and the manufacturer’s instructions.
For suspended ceilings, additional structural work, or complicated recessed designs, consult an appropriately qualified professional.
How Much Does Cove Lighting Cost?
The cost of cove lighting varies considerably depending on the ceiling design, room size, materials, and electrical requirements.
A simple installation using suitable decorative molding and an LED strip may cost less than constructing an entirely new recessed or floating ceiling.
However, the final expense includes more than the visible lighting strip.
Higher-quality LEDs, dimming controls, compatible drivers, aluminum channels, and professional installation can increase the initial cost.
Longer lighting runs may also require additional electrical planning and power equipment.
Ceiling construction can become a significant expense when framing, drywall, plastering, painting, or structural alterations are needed.
Operating costs depend on the system’s total power consumption, daily usage, and local electricity rates.
LED lighting is generally energy-efficient compared with many older lighting technologies, but actual savings depend on the products being compared.
Before starting, request an itemized quotation that includes materials, electrical work, finishing, and any expected maintenance requirements.
Benefits and Drawbacks of Cove Lighting
Cove lighting offers several advantages, particularly for homeowners who prefer gentle illumination and uncluttered ceiling designs.
One important benefit is visual comfort. When the light source remains hidden, reflected illumination can reduce direct glare and create a softer atmosphere.
It can also emphasize ceiling shapes, highlight architectural features, and add depth to plain rooms.
Dimmable systems provide flexibility because homeowners can adjust the background brightness to suit different activities.
However, indirect lighting also has limitations.
Some light is absorbed by the ceiling and walls, so cove lighting may not illuminate work surfaces as effectively as suitable direct fixtures.
Installation can be complicated when the ceiling needs modification, and poor planning may create unwanted bright spots or shadows.
Maintenance access is another consideration, particularly when electrical components are concealed.
For many homes, the most practical solution is to use cove lighting as decorative or supplementary illumination rather than depending on it as the room’s only light source.
Common Cove Lighting Mistakes and How to Avoid Them
Even attractive ceiling designs can produce disappointing results when lighting details are overlooked.
A common mistake is positioning the LED strip where it becomes visible from normal seating or standing positions. This can create glare and spoil the concealed lighting effect.
Another problem is choosing excessive brightness. Very bright strips may produce harsh reflections instead of comfortable ambient illumination.
Uneven lighting can also result from poorly planned strip connections, unsuitable placement, or differences in light output.
Using incompatible dimmers or drivers may cause flickering, unreliable controls, or equipment problems.
Poor heat management can affect LED performance and service life, particularly when components are installed in unsuitable enclosed spaces.
Homeowners should also avoid permanently sealing drivers or other serviceable components behind finished surfaces.
Before completing an installation, test the light during both daytime and evening conditions.
Observe the ceiling from different positions in the room, paying particular attention to corners, shadows, and visible reflections.
Making adjustments before finishing work is usually easier than correcting the installation afterward.
Cove Lighting Maintenance and Troubleshooting
Cove lighting generally requires limited routine maintenance, but occasional inspections can help identify developing problems.
Dust may accumulate inside accessible ceiling recesses and reduce the appearance of reflected illumination.
When cleaning is necessary, switch off the lighting and follow the manufacturer’s cleaning instructions. Avoid spraying liquids directly onto electrical components.
If the lighting begins to behave unexpectedly, simple observations can help determine whether professional attention is necessary.
Common problems include:
- Flickering lights: May indicate an incompatible dimmer, unstable electrical supply, damaged component, or driver problem.
- Dim sections: Can result from connection problems, component failure, or voltage drop along an unsuitable lighting run.
- Uneven colors: May occur because of inconsistent LED products, aging components, or controller issues.
- Dark spots: Can indicate interrupted lighting sections, poor placement, or blocked illumination.
Homeowners can safely check accessible wall switches, approved plug-in connections, and smart lighting settings without opening electrical equipment.
If the lighting repeatedly fails, produces unusual sounds, smells burnt, becomes excessively hot, or trips electrical protection, stop using it and contact a qualified electrician.
Do not attempt repairs to concealed wiring or internal driver components without appropriate training.
Conclusion
Cove lighting can be an effective way to improve the appearance and atmosphere of a home. Its concealed design creates gentle illumination that complements living rooms, bedrooms, kitchens, and other interior spaces.
The best results come from choosing a suitable ceiling design, reliable LED components, comfortable light colors, and properly planned controls.
Practical factors such as room dimensions, installation costs, maintenance access, and electrical safety deserve just as much attention as appearance.
Whether you choose crown molding, a tray ceiling, or a floating ceiling feature, thoughtful planning can help you create attractive indirect lighting that remains practical for everyday use.
Frequently Asked Questions
Can Cove Lighting Be The Main Light Source In A Room?
Cove lighting can contribute to general room illumination, but it may not provide enough brightness for every activity. Combining it with appropriate ceiling fixtures or task lights often creates a more practical arrangement.
Does Cove Lighting Require A False Ceiling?
No. Some installations use specially designed crown molding or existing architectural ledges. A false ceiling may be necessary for certain recessed or floating designs, depending on the room’s construction.
Is Cove Lighting Suitable For Rooms With Low Ceilings?
Yes, certain shallow molding designs can work in rooms with limited ceiling height. Avoid bulky ceiling features that reduce headroom, and choose a layout that conceals the light source effectively.
Does LED Cove Lighting Use A Lot Of Electricity?
LED cove lighting can be energy-efficient, but electricity consumption depends on the strip’s power rating, total installed length, brightness settings, and daily operating hours.
Can Cove Lighting Be Installed In Bathrooms?
Yes, provided the lighting equipment is suitable for its location and moisture exposure. Bathroom electrical installations must meet applicable safety requirements and should be assessed by a qualified electrician.
Disclaimer: This article is for general information only. Cove lighting products and Honeywell thermostat models can have different requirements and troubleshooting procedures. Always consult the relevant model manual or official manufacturer support information. Electrical wiring, gas, furnace, and complex HVAC work should be handled by qualified professionals. Havely Homes is an independent informational website, not an official Honeywell support service, and is not affiliated with Honeywell. Havely Homes was created to provide helpful information to visitors and does not engage in paid promotions or advertising.
